Home     About me     Recipes      Tutorials      Projects     Link Parties      Recipes From Around The World
Showing posts with label Recipes. Show all posts

Sunday, 24 March 2013

Healthier Peanut Butter and Jam Banana Ice Cream


Have you heard that Ben and Jerry's have released a new core flavour here in the UK - Peanut Butter Me Up? Well, I haven't tried it yet but it did inspire me to experiment and make some PB&J ice cream myself.

I am sure you know the banana ice cream trick by now, it has been all over pinterest - it is when you freeze a banana in chunks and then blend it and it turns out like soft serve ice cream - it seriously works - I love my healthier ice cream and also enjoy thinking of ways to jazz it up a bit!

So I present to you the peanut butter and jam banana ice cream - probably healthier than the Ben and Jerry's version and I really enjoyed it! Just 3 ingredients and this ice cream will help satisfy any PB&J cravings you may be experiencing!

Ingredients
1 banana, frozen in chunks
1 tbsp Peanut Butter
1 tsp jam

1. Blend banana until the consistency of soft serve ice cream. Remember to scrape down the sides as you go to get all of the banana in.
2. Add peanut butter and blend until combined, if not combining, scrape into a bowl and mix until combined
3. Top with jam and enjoy!

Fancy something a little less healthy? Why not try these PB and J crumble bars


Have a great day

Love Rebecca

Image Map

Sunday, 10 March 2013

Peanut Butter and Strawberry Jam Crumble Bars


I have been having cravings lately. Cravings for peanut butter and jam. The classic combination that is just comfort food all over! So when my Mum told me she had baked these peanut butter oatmeal bars from Sally's Baking Addiction, I decided that I wanted to get creative, I used that recipe as a base and developed by own Peanut Butter and Strawberry Jam Crumble Bars - made with real strawberries!

So I played around topping ideas and decided to top the oatmeal bars with a layer of fresh strawberries and jam, topped with a crumble topping


My housemates - both not peanut butter fans - raved about these so I think it is safe to say they were a hit. And the certainly satisfied my PB and J cravings!

Peanut Butter and Strawberry Jam Crumble Bars

Peanut Butter Oatmeal Bar Base

1/2 Cup Brown Sugar
1 Cup Peanut Butter
2tsp Vanilla Extract
1 Cup Plain Flour
1 Cup Oats
1 tsp Baking Soda
1/2 Cup Milk
1 Cup Sultanas 

Topping

250g Fresh Strawberries, chopped
100g Strawberry Jam

Crumble

40g Butter
40g Brown Sugar
90g Flour

1. Line a 7x11" baking tray with baking parchment, preheat the oven to 170C
2. Mix the peanut butter and brown sugar with an electric hand whisk for about three minutes until light coloured and fluffy
3. Add vanilla, mix. Add flour, oats, baking soda and mix together. Slowly add the milk until the mixture forms a dough. Fold in sultanas.
4. Press the peanut butter bar mixture into the lined dish making sure to get it into all the corners.
5. In a bowl, mix the strawberries and jam and spread on top of the base, covering it all
6. Rub together the crumble ingredients until you have a powdery crumble mixture, cover the strawberries with crumble
7. Bake for 30-35 minutes until the crumble is browned. Leave to cool completely before cutting into pieces.
 Makes about 14

Peanut Butter ...Love or hate?

Love Rebecca

Image Map

Thursday, 14 February 2013

Heart Shaped, Chocolate Dipped, Sprinkle Covered Brownies


Happy Valentine's Day!
I hope you all have a lovely day spending time with someone you love!
And if you would like a treat to give to someone special how about...
Heart shaped, chocolate dipped, sprinkle covered chocolate brownies 
Now that is a mouthful if ever there was one! 
But they are seriously good! And festive! And chocolatey - oh so chocolatey!


How to make these bites of chocolate heaven....

1. Whip up a batch of your favourite brownies - box or homemade, whichever you prefer. I used this delicious recipe from Sally's Baking Addiction (can you tell I am addicted to this blog!)

2. Let your brownies cool. While they are cooling, put your heart cutter in the fridge - you will need a deep metal cutter in order to cut out your brownie shapes.

3. Cut off the top of your brownie - the crust bit - with a knife

4. Using your cutter, cut hearts out of your brownie (I got 12 hearts out of an 11x7" pan - and one of mine broke so it would have been 13) - don't forget to try some of the scraps to make sure it is delicious!

5. Put your brownies in the fridge for an hour

6. Melt a 200g bar of dark chocolate in a bowl over a pan of boiling water

7. Dip your chilled brownies in the chocolate and immediately top with festive sprinkles

8. Put back in the fridge to set

9. Devour with someone you love!


Have a wonderful day!

Love Rebecca

Image Map

Wednesday, 19 December 2012

Teriyaki Chicken Meatballs


Good afternoon! How are you this wet and windy Wednesday before Christmas?
I have just got back from a fun lunch with one of my best friends, we exchanged gifts and had a good catchup! She is one of those friends who completely knows me and the fabulous presents she gave me (more about those at the weekend) are perfect! I am so excited! 
Now I am home, warm and dry, sat next to the tree with calming music in the background feeling very chilled!
I am at home now and last night I cooked this dish for my parents. I adapted it slightly as we had no lemon, so I substituted a lime, and d'you know what? It actually 100% made the dish! Don't you just love it when that happens! So I am sharing with you my lime version of these yummy baked chicken meatballs.


Taste - ****
Speed - ****
Repeat - Yes


Teriyaki Chicken Meatballs
serves 4
adapted from Good Food magazine January 2013
1 shallot, roughly chopped
1 large spring onion, roughly chopped
1 carrot, roughly chopped
4 chicken breasts, roughly chunked
Zest and juice of one lime
200g basmati rice
300g spring greens, chopped
120ml Teriyaki marinade sauce

1. Add shallot, spring onion and carrot in the food processor and blitz until finely chopped
2. Add the chicken, lime zest and juice and season, blitz until minced
3. Oil your hands and then form the meat into small balls (I made 32), arrange on baking sheets lined with baking parchment.
4. Bake at 180C for 10-15 minutes. They will be cooked through but not browned.
5. Meanwhile, cook rice in boiling water, adding spring greens for last 4-5 minutes until wilted
6. Pour sauce into a pan, and heat gently. Add meatballs to coat with sauce.
7. Drain rice and divide between plates, top with 8 meatballs each.

I hope your preparations are going well...less than 1 week until the big day!

Love Rebecca

Wednesday, 12 December 2012

Leek and Ham Gratin


Hello my lovely readers! How are you all doing today?
It is Wednesday aka my FINAL day of lectures in 2012. This is either good (for obvious reasons) or bad because that means I have to spend the rest of the year revising or writing my assignment...but ...3 days until I go home for Christmas so I guess it all balances out really!

I really enjoyed this meal at the weekend - it is a really warming, comforting meal full of my favourite flavour combination - leek, ham and cheese!

If you omitted the ham it would make a great accompaniment for a roast dinner as well!

Speed - **
Taste - ****
Repeat - Yes 

Leek and Ham Gratin
serves 2
adapted from bbcgoodfood.com
75ml vegetable stock
140ml double cream
75ml milk
1/2 garlic clove, thinly sliced
2 baking potatoes, peeled and thinly sliced
1 leek, washed and thinly sliced
2 slices of good quality ham
60g cheddar cheese, grated

1. Add stock, cream, milk and garlic to a pan and heat through and bring to the boil. Remove from the heat
2. Meanwhile, mix potatoes, leek and ham in a greased ovenproof dish
3. Pour the stock/cream mixture over the potatoes and top with cheese
4. Cook at 160C (fan) for 25-35 minutes until the potatoes are tender and the top is browning
5. Enjoy!

Have a brilliant day!

Love Rebecca

Wednesday, 28 November 2012

Vegetarian Shepherd's Pie


I am very much impressed with the new recipe I tried this week - Vegetarian Shepherd's Pie. I am not a vegetarian, and I love a good shepherd's pie with mince but I do like lentils and was intrigued when I saw this recipe. I must say I loved it! It was delicious and just as comforting as regular Shepherd's Pie. I will be making it again for sure! 
The only problem with my pie was that I didn't have enough sweet potato for the dish I used so in the recipe I have upped the quantity for you!

Speed - **
Taste - *****
Repeat? - YES!

Vegetarian Shepherd's Pie
Serves 2
Adapted from bbcgoodfood.com
1 small onion, finely chopped
1 large carrot, peeled, cut in half and sliced
Dried Thyme - a light sprinkling
1/2 can tinned tomatoes
150ml vegetable stock
140g red lentils
2 sweet potatoes
Small handful of grated cheddar

1. Fry onion gently for 5-7 minutes until golden. Add carrots and a sprinkling of thyme
2. Add stock, tomatoes and lentils, simmer for 15-20 minutes until the lentils are tender
3. Meanwhile, prick the sweet potatoes all over with a fork and microwave (skins on) for 15-20 minutes until soft
4.Cut the sweet potatoes in half and when cool enough to touch, squeeze the flesh out of the skin into a bowl. Discard the skins and mash the flesh
5. Pour the lentil filling into an ovenproof dish and top with the sweet potato mash. Finally, sprinkle over the grated cheese
6. Cook at 170C (fan) for 20 minutes until the cheese is melted and golden!

I hope you are having a great week!

Love Rebecca


Wednesday, 21 November 2012

Cauliflower Cheese Pasta Bake


I love Cauliflower cheese. There is something very comforting about the warm gooey creaminess of it. It is definitely my favourite way to have cauliflower (I love cauliflower cheese soup as well - that is a delicious way to eat it!). 
So when I saw this recipe for a cauliflower cheese pasta bake, I knew I had to give it a go. I have adapted it slightly to suit my tastes but I really enjoyed the results. 
Warning! This dish creates a fair amount of washing up (4 pans!) but it is totally worth it! I promise!

Taste - *****
Speed - **
Repeat - 100% Yes!

Cauliflower Cheese Pasta Bake
serves 2
adapted from bbcgoodfood.com

1/2 tin chopped tomatoes
1 garlic clove finely chopped
250ml milk
16g plain flour
16g butter plus 1/2 tbsp
1/4 tsp Dijon mustard
33g grated cheddar
20g Parmesan or blue cheese (depending on your tastes)
1/4 tsp freshly grated nutmeg
85g pasta
1 small cauliflower
160g fresh spinach
1 whole garlic clove, peeled

Preheat oven to 180C

1. Fry chopped garlic in a little oil. Add tomatoes and simmer until the rest of the dish is ready
2. Add pasta and cauliflower to a pan. Top up with boiling water and cook until tender
3. Put flour, milk and 16g butter into a pan. Heat, whisking constantly until smooth and the butter is completely melted. Let bubble for 3 minutes then remove from heat, stir to remove any flourness
4. Stir through and add mustard, most of the cheddar, half of the Parmesan and half of the nutmeg
5. Melt 1/2 tbsp butter in a pan. Add whole garlic clove, remaining nutmeg and spinach. Season well with pepper. Cook until the spinach is very wilted. Remove the garlic clove
6. Set aside 100ml cheese sauce. Stir the rest into the drained pasta and cauliflower
7.  In a medium oven proof dish, spoon half of the tomato sauce over the bottom. Add half of the spinach and top with all the pasta and cauliflower. Top with rest of spinach, then rest of tomato sauce. Finally, pour over remaining cheese sauce and sprinkle with remaining cheese
8. Cook at 180C for 20 minutes until the top is browned and the dish is bubbling!

Thursday, 15 November 2012

A Very Twilight Movie Night - Popcorn and a T-Shirt


Are you excited? Its the release of Twilight Breaking Dawn Part 2 tomorrow! I have unleashed my inner fangirl this week in preparation!
My amazing friend Tori and I watched the first part last night and we are going to watch the second part next Wednesday (so don't tell me what happens!)
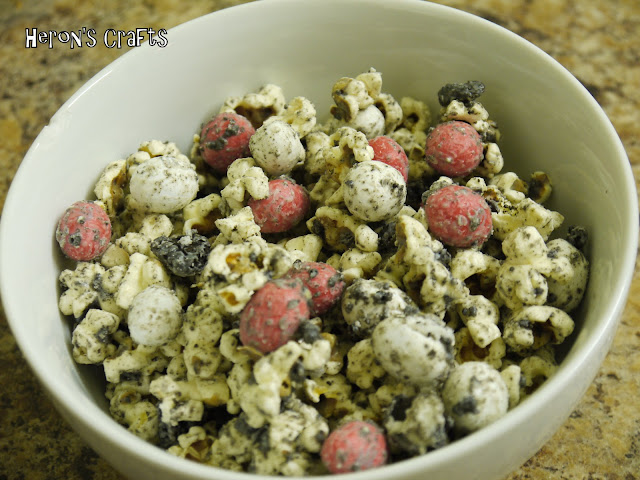
To keep us going in through the film (or keep Tori going through the film because apparently the presence of Taylor Lautner was not enough (exasperated sigh) - she is going to hate  love me next week with my Breaking Dawn t-shirt in the cinema!) I made some Breaking Dawn inspired popcorn. 
It incorporates the colours on the front cover of Breaking Dawn I used oreos (for the black) and white/red M & Ms!

Ingredients
1/3 Cup Popcorn Kernels
200g White Chocolate (less a few squares for taste testing!)
8-10 Oreo Cookies

1 bag of red/white/blue peanut M&Ms (blue ones helpfully eaten by a housemate!)

1. Pop popcorn according to the packet instructions
2. Melt chocolate and pour over popcorn, stir to combine
3. Crush the oreos and stir in along with the M&Ms
4. Spread on a baking sheet and leave to set.


Want to see the t-shirt I will be wearing to see the film?

Well I used this fab tutorial that Marissa from Rae Gun Ramblings posted for the Storybook Craft Project to make my own Twilight shirt!


Are you a Twilight fan? 

Love Rebecca

Wednesday, 14 November 2012

Autumnal Pork and Apples


Are you feeling very autumnal right now? I sit in lectures and can see the leaves falling off the trees out of the window ready for me to kick through on my way home! Cannot believe that winter is almost upon us!
This week's new meal is the perfect dish for an Autumnal evening! It was quick and very easy to make! Oh and it tasted delicious - the combination of sage, mustard, pork and apples was lovely!
I made mine with the potato wedges I cooked here because I am literally HOPELESS at mashed potato!

Speed - ***
Taste - ****
Repeat - yes!

Autumnal Pork and Apples
adapted form bbcgoodfood.com
Serves 2
2 Pork steaks
2 eating apples, cored and sliced into about 8 pieces each
1 onion, peeled and sliced
1 tsp dried sage
50ml chicken stock
1 tsp dijon mustard

1. Heat a frying pan with a little oil and fry the steaks for 2 minutes on each side, until just golden.
2. Transfer pork to plate
3. Fry apples, onions and sage for 4-5 minutes until the apples are softened
4. Add the stock, mustard and pork, simmer for 10 minutes until the sauce is reduced and the pork is cooked through
5. Serve with vegetables and/or your choice of potatoes.

Love Rebecca

Wednesday, 7 November 2012

Warming Winter Chilli with Potato Wedges


Last week's new recipe of the week was this winter warming chilli! It was simple to make and delicious to eat! I really enjoyed this meal - it is perfect for a cold winters day! 

I would do the potato wedges first, get them in the oven and then start the chilli - then it will be ready in line with the wedges! This my first time cooking with chocolate in a savoury dish as well - you cannot taste the chocolate - don't panic - I think it is supposed to deepen the flavour of the chilli!

Taste - ****
Speed - **
Repeat - Yes!

Vegetarian Chilli with Potato Wedges
adapted from bbcgoodfood.com
serves 2
2 medium baking potatoes
1/2 onion, finely chopped
1 yellow pepper, chopped
1-2 tsp cajun seasoning (depending on your taste)
1 can mixed beans
1/2 can tinned tomatoes
75ml vegetable stock
1/2 tblsp dark chocolate
Sour Cream to serve

1. Leave potatoes unpeeled. Simply cut unto 8 wedges. Toss in a little oil and bake in a 200C oven for 40 minutes, turning halfway
2. Meanwhile, fry onion and pepper in a little oil for 5 minutes
3. Add cajun seasoning, mixed beans, tinned tomatoes and stock
4. Cover and simmer for 20 minutes or until wedges are ready
5. Take off the heat and stir in chocolate until melted
6. Serve chilli in bowls with a spoon of sour cream on top and wedges on the side

What is your favourite comfort food on a cold day?

Wednesday, 24 October 2012

Brazilian Panquecas

Sorry about the pictures! By the time it made it to my plate it did not look great - lets just say it is not the easiest thing to make look sophisticated!

This week's new meal is from Brazil and I would describe it as Enchiladas with pancakes instead of tortillas, and less spicy. I actually really enjoyed this meal tonight, it didn't take too long to cook, was fairly easy (or is if you have an prowess at pancake cooking - I however, do not!), and it was nice and tasty!

I have split the recipe into its component parts. It looks alot but trust me, it isn't too much effort - you just have to be able to multi-task a bit!!

Speed - ***
Taste - ***
Repeat - Probably!


Brazilian Panquecas
adapted from maria-brazil.org
serves 1
Crepes
1 egg
3/4 cup milk
1/2 tbsp oil
1/2 cup plain flour

1. Blend all ingredients until smooth - I used an electric whisk.
2. Heat some oil in a pan. Make sure the oil is spread over the whole pan (very important!) 
3. Add a couple of large spoons of batter to the pan. Cook as you would pancakes, until slightly browned and then flip!
4. Repeat with all the mixture - I got 2 and bit crepes out of my mix

Filling
100g beef mince
1/2 onion, finely chopped
1/2 clove garlic, finely chopped

1. Heat some oil in a pan and then add onion and garlic. Cook for a couple of minutes until softened
2. Add mince and cook through

Tomato Sauce
1/4 Onion, finely chopped (red would be nice)
1/2 tin chopped tomatoes

1. Soften onions in a little oil over a medium heat
2. Add tomatoes and heat through

Plus Grated Cheese!

Assemble!
1. Divide your beef mixture between your crepes. Wrap up and lay in a Pyrex dish
2. Pour over tomato sauce
3. Top with a generous helping of melted cheese
4. Cook in the oven at 180C until the cheese is well melted, 10-15 minutes

Have a great day

Wednesday, 17 October 2012

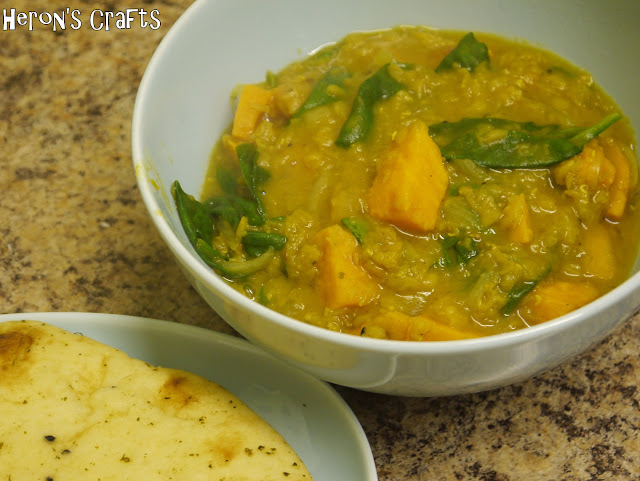
Sweet Potato Dahl Recipe

This may look a bit like a sloppy mess but trust me...it is very yummy!

Hello all! Hope you are having a good week so far! Mine has been very tiring but a lot of things are slotting into place and I understand what I am doing this year so much more! Just one more seminar tomorrow, a couple of days to do a heap of reading and then I get to see my parents at the weekend for the first time in a  month! Happy Days!
Anyway, this week's new recipe is quick, very easy and really yummy - a win win really!
I made the whole recipe and it made one main meal and two lunches perfectly.

Speed - **** (ready in 25 mins)
Taste - **** (very flavoursome and yummy!)
Repeat - Yes! I would, I liked the ease of the recipe and the taste as well!

Sweet Potato Dahl
adapted from bbcgoodfood.com
Serves 2
100g Lentils
450ml Vegetable stock
1 small onion, finely chopped
4 cherry tomatoes, chopped
1/2 tsp turmeric
1 tsp garam masala
dash of sweet chilli sauce
1 medium sweet potato
3 handfuls baby spinach
2 naan bread to serve

1. Put lentils, stock, onion, cherry tomatoes and spices into a pan. Bring to a simmer and cook for 10 minutes
2. Peel and shop the sweet potato into small chunks
3. Add sweet potato to pan and cook for 12 minutes until tender
4. Meanwhile, warm naan bread in a low temperature oven
5. Stir in the spinach and cook for a minute or two more until the spinach has wilted
6. Serve with the naan bread


Have you tried any super speedy meals perfect for midweek cooking recently?

Love Rebecca

Friday, 5 October 2012

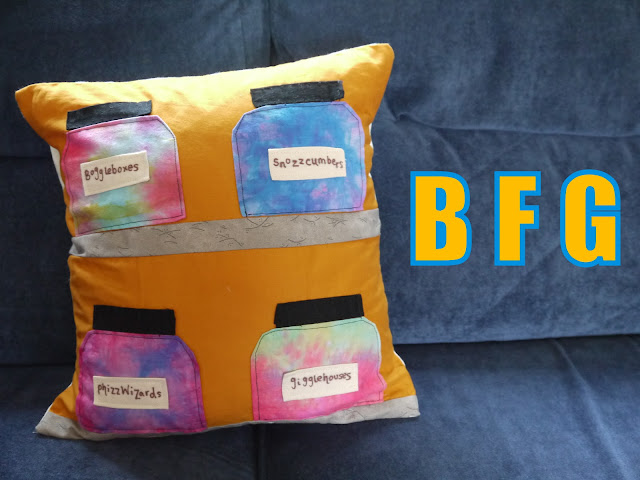
Storybook Craft Project - BFG Dream Jar Cushion

Have you read the BFG? It was one of my favourite Roald Dahl books as a child! It was one of those books that really caught my imagination, from the very first chapter when the BFG tells us he can hear the screams that flowers make when we pick them (due to his extremely large ears!). The bit that always got me though was when he is catching and mixing dreams to send to kids on a night!

I went in search of the perfect dream fabric at a Quilt show and found this dyed fabric in blues and pinks that I thought would be perfect. The cushion itself is fairly easy. I have included the template for the jars, but you could adapt it to make different sized jars if you would like to! For the labels, I chose some of my favourite words from the book such as 'Snozzcumber' and 'Gigglehouses'. I then used a sharpie pen to write on the calico labels! As always, leave or comment or drop me an email if you have any questions!

Materials
Dream Fabric
Black Fabric (for lids)
Background Fabric
Shelf Fabric (I used textured grey)
Calico
Black Sharpie/Fabric Pen

1.Cut 2 pieces from your background fabric, 6" x 13 1/2"
2. Cut 2 shelves, 1 1/4" x 13 1/2"
3. Sew a shelf under each background piece then sew the two pieces together so you have background, shelf, background, shelf, as in the picture.
4. Draw round the Jar template onto freezer paper. Iron on to the reverse of your dreamy fabric - make sure to choose a good bit, where the dye is particularly interesting. Cut out, leaving a 1cm border. Iron over the border in line with where the freezer paper is. Remove the freezer paper. You should now have a hemmed jar shape. Repeat with the other three jars.
5. Cut out 4 rectangles from the freezer paper, 3 1/4 by 1 1/4. Iron onto the back of the black fabric and cut a 1 cm border (as above). Iron over so you have 4 hemmed rectangles (don't forget to remove the freezer paper)
6. Pin the Jars in place on top of the shelves. In a contrasting colour, sew round the edge
7. Align the jar lid on top. Sew vertically down the left side. Stitch another top to bottom line 1/4 inch from the first. repeat all the way along the lid. This creates the texture of a ridged lid on your jar.
8. Cut four pieces of calico 3" x 1 1/2". Fold over 1/4" on each side and press. On the front, write your label. Stitch to the centre of the jar in a matching colour thread. repeat with other three labels


Downloadable Dream Jar Template


And there you have it! One dreamy BFG cushion! And if you have got this far and have no idea what I have been taking about - The BFG is The Big Friendly Giant!

Join me again next week for a project inspired by a very special bear...found in Paddington Train Station!


Wednesday, 3 October 2012

Australian Damper Bread and Roasted Squash Soup

It seems positively AGES since I posted a new recipe from some far flung corner of the globe. This week I gave Australian Damper Bread and a yummy Autumnal squash soup a try - although I was lacking the traditional campfire in the outback on which to cook it! Still it turned out pretty good! The bread was amazingly crusty on the outside - definitely my favourite bit! I liked the soup as well - the paprika gave it a heat without being overpoweringly spicy!

Taste - ***

Speed - *** (no rise bread!)

Repeat? - probably


Damper Bread
adapted from all down under
Makes one small-medium loaf

2 cups self raising flour
1/4 tsp salt
1 cup milk
2 tsp sugar
2 tsp butter

1. Mix flour, salt and sugar together in a bowl
2. Rub in the butter to get fine crumbs
3. Add milk gradually to form a soft dough - I needed just less than a cup, you may need more or less - the dough should form one lump but not be too sticky
4. Knead lightly until smooth
5. Shape into a round and flatten very slightly. Put in a greased and floured circular tin
6. Brush the bread with milk and slash a cross into the top
7. Bake at 190C for 30 minutes or until browned - it should sound hollow when the base is tapped.


Squash Soup
Adapted from all down under
serves 4


1 tbsp fresh rosemary, finely chopped
1 tbsp olive oil
1 Butternut squash, peeled, deseeded and cut into 1" chunks
1 small potato, peeled and cut into 1" chunks
1 large onion, coarsely chopped
2 garlic cloves, finely chopped
1/2 tsp paprika
Pinch of chili flakes
1 litre chicken stock

1. Toss potato, squash, rosemary and oil together. Spread out on a roasting tray and roast at 200C for 25-30 minutes until tender
2. Meanwhile, heat a little oil in a large pan and add onion, garlic, paprika and chili. Cook for about 10 minutes until the onions have softened.
3. Added the roasted potatoes and squash to the pan along with the stock and bring to the boil before reducing to a simmer for 10 minutes
4. Blend or mash until smooth. Return to pan and heat through
5. Serve

Have you started cooking autumnal soups? It is definitely the weather for it here!

Sunday, 23 September 2012

Ginger Bites Recipe


I will always remember visiting my Nana when I was younger - she used to have these lunchboxes on the side in the kitchen full of baked goodies - almond tarts, date and walnut loaf and my personal favourite – Ginger Bites! This delicious chocolatey, gingery bite of yummyness has become my favourite comfort food and every time I eat it, it sends me straight back to my Nana’s kitchen, and of course, she is always there.


My Nana died 3 years ago and I still miss her every day. Her motto was ‘you’ve got to laugh’ and I think is the wisest statement (especially when said in my Nana’s Yorkshire accent) that anyone could live by. Everyone knows that laughter is the best medicine and seriously, I know that life can get pretty bad but if you find something, anything to make you chuckle, giggle or laugh out loud…it may not seem so bad!

So in honour of my very special Nana, I would like to share the recipe for her delicious no-bake Ginger Bites!

Nana's Ginger Bites

300g Ginger Biscuits
120g butter
2 tbsp golden syrup
100g glace cherries
200g dark chocolate, broken

1. Whizz ginger biscuits in food processor until you have fine crumbs
2. Tip crumbs into a bowl and stir in cherries
3. In  a pan, melt syrup and bitter, when melted, stir into biscuit crumb mixture
4. Press into a greased 18cm square tin
5. Melt dark chocolate in a bowl over a pan of hot water, on the hob
6. Pour chocolate over the crumb mixture
7. Once cool, transfer to fridge to set
8. Enjoy!


Tuesday, 18 September 2012

Ratatouille Pizza


Have you heard of 'Pure Wow'? It is a lifestyle email service that sends recipes, fashion, culture and so many more things! They have sent me some great recipes and this was one of them. A delicious vegan pizza full of yummy vegetables ... I swear you won't even miss the cheese!

It takes quite a bit of effort but I truly believe that it is worth it! First make the dough and leave it to rise then get started on the vegetables, while they are grilling, make the tomato sauce and salad before putting it all together!

Speed - *
Taste - ******* (many, many stars)
Repeat - YES!

Pizza Dough
adapted from Jamie Oliver
500g wholemeal bread flour
1/2 tsp salt
7g sachet of dried yeast
1/2 tbsp caster sugar
2 tbsp olive oil
325ml lukewarm water

1. In a large bowl, combine all of the dry ingredients
2. Add oil and stir in some of the water, combine
3. Keep adding water until combined and knead for 5-10 minutes into a springy pizza dough.
4. Cover with lightly oiled cling film and put in a warm place for one hour or until the dough has doubled in size


Ratatouille Pizza
adapted from Pure Wow

2 handfuls cherry tomatoes
Olive Oil
1 small aubergine, sliced into 2cm strips
1/2 butternut squash, sliced into 2cm strips
1 courgette, quartered length ways
3 tsp basil leaves
1 small garlic cloves
1/2 tsp thyme leaves
1 tsp mint leaves, finely chopped

1. Preheat the oven to 220C. Toss cherry tomatoes with 1 1/2 tsp of olive oil, and roast until cooked through - 15-20 minutes, set aside
2. Turn on grill to high. In a large bowl, combine aubergine, squash and courgette with 1tsp olive oil, 2 tsp basil, garlic and thyme
2. In batches, grill the aubergine, squash and courgette until grill marks appear (5-10 minutes on each side)
3.  When grilled and cooled slightly, chop into bite sized chunks. Combine grilled vegetables with tomatoes and the remaining 2 tsp basil, and the mint
4. Roll out dough to fit a rectangular baking tray (about 25 x 40 cm) and brush both side with olive oil. Line tray with baking parchment, and lay the dough on to baking parchment
5. Put the baking tray under the grill and grill for 3-4 minutes until crisp and lightly charred
6. Flip the dough and spread with tomato sauce. Top with all the reserved vegetables
7. Return to the grill for 5-8 minutes until the vegetables are warmed
8. Top with fennel salad (see below) and serve


Tomato Sauce
adapted from Jamie Oliver
1 tin of chopped tomatoes
Clove of garlic
Small handful of basil leaves

1. Fry garlic in a little oil until starting to brown
2. Add tomatoes and basil
3. Simmer until reduced slightly


Fennel Salad
adapted from Pure Wow
2 large handfuls of rocket
1/2 fennel bulb, trimmed and thinly sliced
1 tbsp olive oil
Juice of 1/2 lemon

1. Toss all the ingredients together in a bowl


Enjoy!

Tuesday, 11 September 2012

No Oven? No Problem! A Collection of Slowcooker and Microwave Recipes

You might have noticed that I haven't posted any recipes these last couple of weeks. Well we have had our kitchen redone so we had no oven and no hob which has made cooking a challenge and we had to rely on the microwave, slowcooker and BBQ. With the help of pinterest I found some great recipes that I will share and review with you today!


Microwave Squash Risotto


Microwave butternut squash risotto
BBC Good Food
We really enjoyed this. It was easy and I was surprised at how the rice cooked just as if we had done it on the hob. The only thing I would change would be to reduce the amount of sage as the flavour was quite overpowering!

Slow Cooker Jambalaya

from American Family
This was probably my favourite recipe we made! Delicious flavour of jambalaya, packed with veg, chorizo and prawns. The rice cooked really well and I would definitely make this one again!


Slow Cooker Sesame Ginger Chicken

IMG_0414
from Keeping Up With The Joneses


This was refreshingly flavoursome slowcooker dish and i was impressed that the chicken was not dry but instead moist and yummy! The ginger and spring onions created a delicious dish!

Microwave Sweet Potato

Tuna sweet potato jackets
from BBC Good Food


I liked this meal - it is minimal effort and the result is very tasty. Simple and quick after work dinner - the only bit that takes any time is cooking the potatoes!

Slow Cooker Enchiladas


Slow Cooker Enchiladas Recipe
from Taste of Home

This was another one of my favourites! I love the taste of cooked wraps and although you don't get the crisp crunchy bits you get if they are cooked in the oven, these still tasted great! One tip - follow the instructions and don't put a tortilla layer on the bottom - mine stuck majorly! Other than that it was yummy!

Slow Cooker Pasta

from Becoming Betty


Again, another slow cooker meal that I really enjoyed! I was a little skeptical about whether the pasta would cook but it did and the pockets of mozzarella were sooo good!

So there you have it...we managed to survive 2 weeks without a functioning kitchen and although I NEVER want to do that again - we made it through without ordering takeout or eating out once and have gained some great recipes!

I am so happy now that our kitchen is finished - I think I was having baking withdrawal!

What is your favourite slow cooker meal?

Monday, 3 September 2012

Hunger Games Bark


Today (in the UK at least) is the Hunger Games DVD release day! I have bought the DVD and spending the evening with my family watching it again!

No special movie night occasion like this is complete without some themed snacks! So I give you...Hunger Games Inspired Bark. I stumbled across this great bark recipe at Gingerbreadbagels and was inspired to make my own variation.

The ingredients are symbolic (ha...this is where I go philosophical on you!) The orange candy melts represent Katniss - the Girl on Fire, the Oreos (crushed up) represent the coal of district 12 and the chocolate...well its just chocolate (shhh!)

This is very easy to make especially in my current oven-less state (Kitchen still being redone) as all it needs is the microwave to melt the chocolate!

I made a small batch by using a smallish bar of chocolate - you can vary the amount of chocolate to suit your quantity desires!


Ingredients
Bar of chocolate 
A couple of crushed oreos
Small handful of Orange candy melts


1. Melt the chocolate and candy melts as per packet instructions (in microwave or over hob - its up to you)
I did mine in the microwave for a minute then 30 seconds at a time until melted

2. Line a baking sheet or tray with baking parchment and pour over your melted chocolate. Form a rectangle (or whatever shape you fancy)


3. Add a few blobs of melted orange


4. Use a cocktail stick to swirl the orange around in the chocolate (have fun with this and add more orange if needed!)


5. Top with pieces of crushed oreo, cover with cling film (not touching the chocolate) and leave to set for a few hours until the chocolate is hardened


6. Enjoy and May the Odds Be Ever in Your Favour!

Love Rebecca

Wednesday, 22 August 2012

Its a Wrap Wednesday - Round-up


I have now shared with you the recipes for all the wrap variations I have enjoyed while at university this year. Here is a round-up of all the recipes in one place for you!

Related Posts Plugin for WordPress, Blogger...