Home     About me     Recipes      Tutorials      Projects     Link Parties      Recipes From Around The World
Showing posts with label Friendship Bracelet. Show all posts

Sunday, 2 September 2012

Arrowhead Friendship Bracelet Tutorial


Welcome to my tutorial on how to make an arrowhead friendship bracelet. This tutorial assumes a knowledge of the knots used in this type of bracelet that are taught in this tutorial on basic friendship bracelets. So please visit this link and make a simple bracelet to get used to the knots so that you are ready to make an arrowhead design. 
Already caught up? Well here goes then....

Materials
3 colours of embroidery thread
sellotape
scissors

1. Choose three colours. Wrap your first colour round your wrist three times then double this length before you cut the thread. Use this strand to cut your other two threads so that they are the same length

2. Line all three strands up and fold in half, tie a knot so you have a loop at the top and six strands

3. Sellotape to the table and lay out as in the picture so that the threads are symmetrical - 1 and 6 are the same colour, 2 and 5, 3 and 4. 
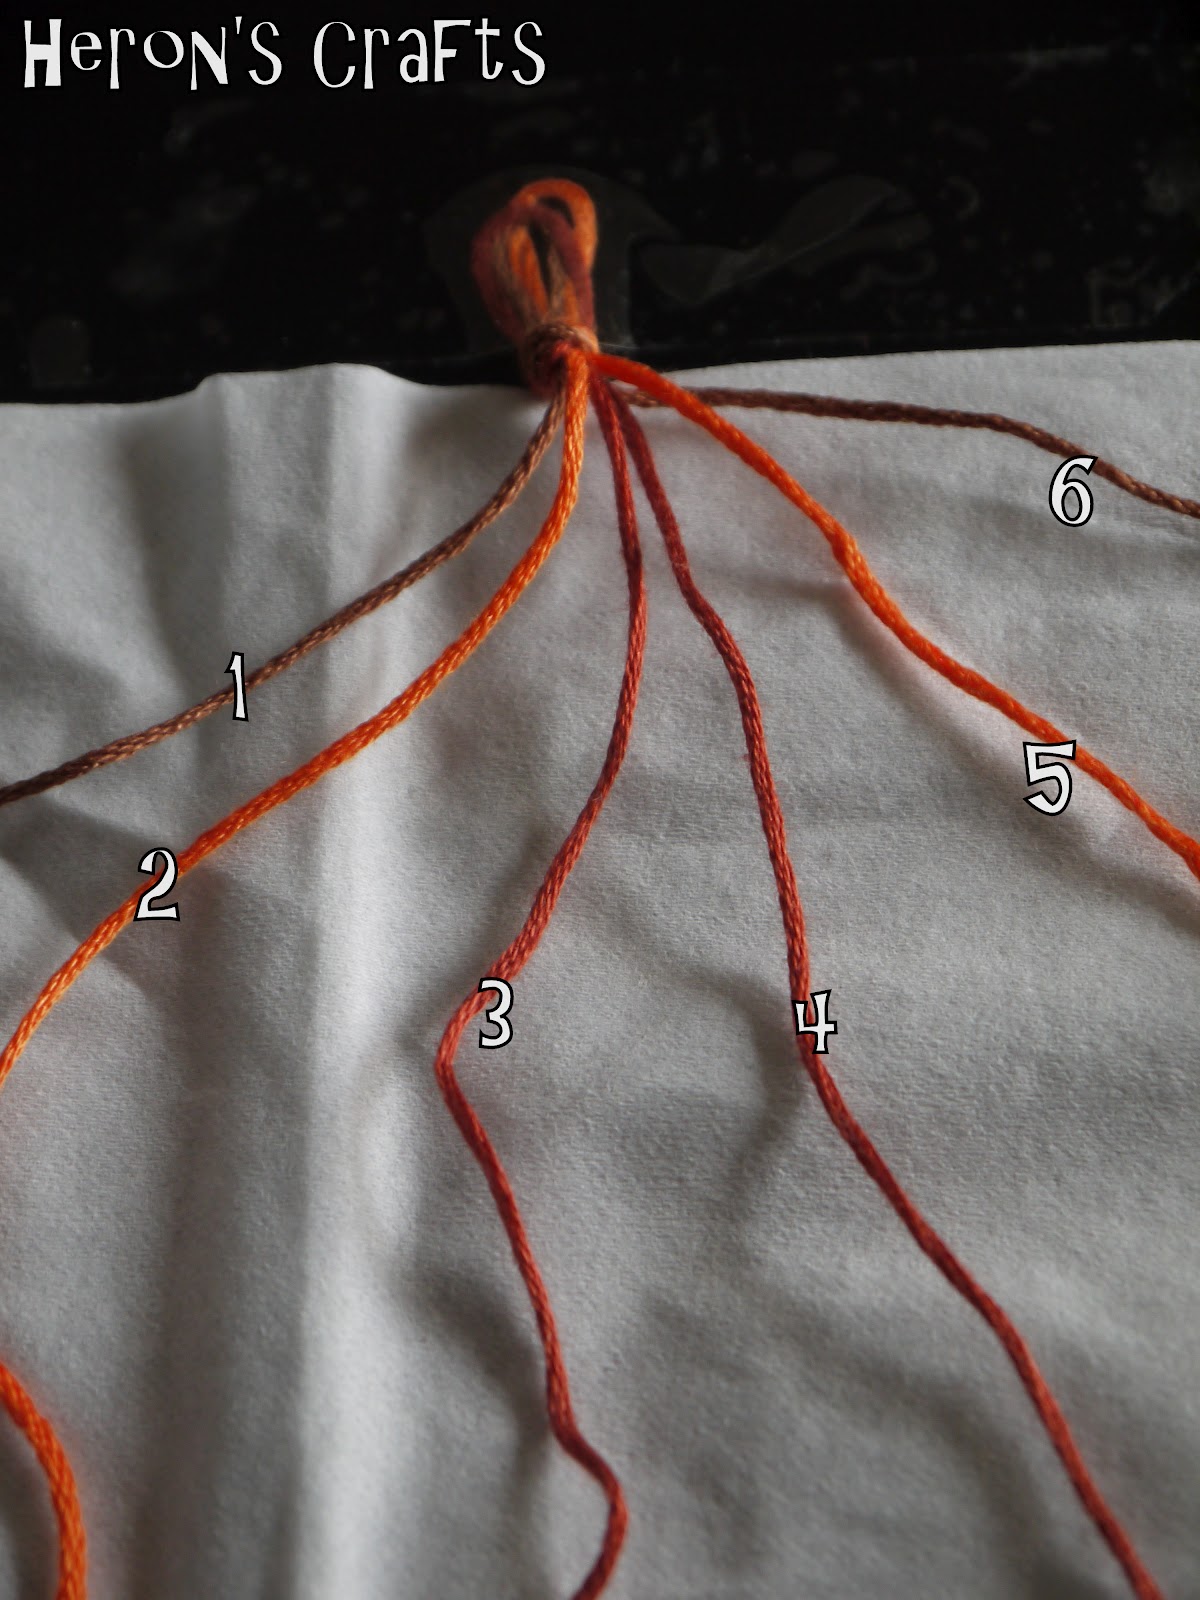


4. Use thread 1 to make two knots on thread 2 and then two knots on thread 3 as in a basic friendship bracelet


5. Use thread 6 to make two knots n thread 5 and two on thread 4 - these are the same as the basic knots but in reverse (see bottom of page for instructions on a reverse knot). Next use thread 6 to make two knots on thread 1 (same colour thread that is left in the middle after step 4). Threads 1 and 6 should now be on opposite sides to where they started as in the picture. You should now have a complete arrowhead with two knots on either side of a centre knot.


6. Repeat this whole process starting with thread 2. Continue until bracelet is long enough to fit on your wrist.

7. To finish the bracelet off...make two plaits with the threads.


REVERSE KNOT

1. Lay thread 6 over thread 5


2. Bring thread 6 under thread 5, as in the picture


4. Pull tight to form loop and pull knot to top of bracelet. Make sure you form two knots on each thread.


And there you have it!

I would love to see any bracelets you make using this tutorial. What colours will you choose?

Love Rebecca

Friday, 27 April 2012

Olympic Countdown - 13 weeks to go - Friendship Bracelets


A few weeks ago I shared  my friendship bracelet tutorial showing you how to make basic friendship bracelets. Today I am sharing some Olympic inspired colour combinations that are perfect for showing your support for London 2012 or your county's athletes!

1. Great Britain 

I used two strands of each colour to get this extra thick stripe

Colours - red, blue and white


2. Great Britain Team Kit

This kit was released a couple of weeks ago and there was a lot of criticism in the media that it was too blue - I quite like it and the colours look great round my wrist!

Colours - navy blue, white blue, turquoise, white

source


3. Usain Bolt

My favourite sprinter and the athlete I will be supporting in the 100m final!
I usually finish my bracelets off with a plait - I think it makes it look neater and is useful for tying round your wrist!

Colours - black, green, yellow

source

4. London 2012 Mascots - Wenlock and Mandeville

This bracelet is made as two, one for each mascot and then tied together.

Colours
Bracelet one - one thread each white and orange
Bracelet two - one thread each white and blue

Make the bracelets the same size and then tie the ends together to create one paired bracelet

source

5. Olympic Rings - the universal symbol of the Olympics!

Colours - black, blue, yellow, green, red


Have a great weekend!

Love Rebecca

Do you like what you see? I am now selling made to order Friendship Bracelets - drop me an email if your interested and we can talk colours! [heronscrafts (at) hotmail (dot) com]

Linking to...
Naptime Crafters
The Grant Life
Six Sisters Stuff 
Craftbotic
Family Ever After 
Positively Splendid 
Making the World Cuter
Rae Gun Ramblings
Sew Much Ado
Fireflies and Jellybeans
A Creative Princess

Tuesday, 20 March 2012

Hunger Games Bracelet


First off, apologies for the blog silence this past week. Last week was the last week of term and it was slightly crazy getting all my work done for the last day! I am spending all week this week in a primary school and loving it! Next week I will be at home, relaxing and hopefully, attempting some of the projects I have pinned and haven't had the time to try out!


So, Friday: Hunger Games is released in cinemas (although I am not seeing it until next Wednesday :( !). I am loving the Hunger Games projects that are scattered around the blogworld at the moment! Following from my Hunger Games cushion, I made a friendship bracelet in co-ordinating colours to wear next week when I finally get to see the film!

To make your own Hunger Games friendship bracelet, check out this tutorial but use 4 strands of thread; 2 black and 2 gold.
Hope you all enjoy the film this week. May the odds be ever in your favour!

Love Rebecca

Linking to
Rae Gun Ramblings 
Sew Much Ado 


Sunday, 11 March 2012

Friendship Bracelet Tutorial


Did you know that if you wear a friendship bracelet until it falls off your wish will come true? Great excuse to have a go at making these for all your friends to help their wishes come true!

I learnt how to make these basic bracelets when I was about 12 and its one of those things that once you know the basic knot, you can create a whole host of pretty bracelets! Today, I am going to attempt to show you how to make the simple three thread bracelet!
I have made this tutorial in pictures as I think that that is the easiest way to show you how to make your own friendship bracelets! I will go through the basic knot that is used to make the bracelets.

1. Materials


The important thing here is colour selection! You can say so much even with a simple three colour bracelet. Some ideas...
Twilight - red, white, black
Hunger Games - black and orange
Summer - yellows and oranges
Christmas - green and red
Patriotic - red, white and blue

If you are making this for a friend, their favourite colours are always a good place to start!


2. Cutting and measuring your thread

The ideal length is a little over three times the size of your wrist...


This makes it so much easier to knot!

3. Tying the knot

I find it easiest to hold thread two/three with my right hand and use my left hand to tie the knots with thread one. The following pictures show you how to tie the basic knot.


4. Making a row

To make a row, the knot needs to to be tied twice on each other thread (so if you have three threads, your row will be made up of 4 knots)


5. Second row

The red thread is now thread 1, repeat knotting procedure to tie another row, and another, and another!

And there you have it! The simple friendship bracelet! Once you have mastered this one, you can make any design you like - I will show you some more ideas in the next few weeks! So what are you waiting for, grab some threads and make someones wish come true!

If you have any questions, just ask! I'd love to hear how you get on!

Love Rebecca


Do you like what you see? I am now selling custom made Friendship Bracelets - drop me an email if your interested and we can talk colours! [heronscrafts (at) hotmail (dot) com]


Linking to
Making the World Cuter 
Sew Much Ado
Rae Gun Ramblings
Fireflies and Jellybeans
Six Sisters Stuff
Posititvely Splendid 

Tuesday, 14 February 2012

Valentine's Day

Happy Valentine's Day! Hope you are all having a great day! I don't usually do anything for V-day, being single usually excludes you from traditional v-day activities but this year I decided to look at this holiday in a different way!
Valentine's Day is a day to celebrate love, all kinds of love! Today I am celebrating my friends who mean the world to me! I found this cute valentine's idea over at Dandee Designs and decided to adapt it to make these presents for my friends in York! I love making friendship bracelets (tutorial will be coming soon I promise) and choosing colours and patterns for specific friends is a great way of personalising them!

(Apologies for the poor pictures! I only finished these at about 9pm last night and that was the only chance I had to photograph them before giving them to my friends this morning! I put each in an envelope and slipped it under their doors (I need to post the third on my way to town later!)

Zigzag

Arrowhead
Stripey


Whoever you are spending today with, celebrate love and enjoy yourself!

Love Rebecca
Related Posts Plugin for WordPress, Blogger...