Home     About me     Recipes      Tutorials      Projects     Link Parties      Recipes From Around The World
Showing posts with label Project. Show all posts

Saturday, 4 May 2013

Revision Survival Pack


THAT time of year is upon us. The time when exams are everywhere and students of many ages are working hard to consolidate all the information they should have learnt during the past year in order to succeed in their upcoming exams. And I am no different. I am less than one month away from my third year University exams and revision is in full swing (as well as continuing dissertation work). All of my friends are also hard at work and we are often together in the library. All the revising all the time can get a bit much so I decided to make little revision packs for my closest friends to help them on their way. These are a thoughtful gift for anyone currently immersed in revision and can be a sweet relief from the stress that revision can bring. So what did I include in my pack...well all the essentials of course (wink!)....


1. Stress Relief Pills (aka smarties) - find a cute little jar and fill it with smarties or m&ms or some other small candy - whatever floats your boat really - I chose pink smarties for my friend Tori due to her love of pink - this was just another way to personalise the packs


2. Stress Relief Capsules (aka Bubble wrap) - this is a bit of a joke item, guaranteed to raise a smile - bubble wrap, for popping when stress needs an outlet!


3. Emergency Chocolate - This is a revision pack must - for those moments when you don't get it, or you have just been staring at the page for so long and nothing is going in anymore! I bought some Dairy Milk bars and wrapped them up in 'emergency' wrappers - the instructions on the back advise 'For best results, eat entire bar'.


4. Countdown Calendar - this is possibly my favourite item in the pack. The calendar contains all the dates between the date of giving the pack and the first day of freedom after exams, which allows your recipient to cross off the days and see themselves getting closer to freedom!


I put it all together in a brown paper bag and added the 'Keep Calm and Carry On Revising' label to the outside.

Below is a PDF download that will allow you to create your very own Revision Survival Pack for someone you know going through exams. All you need to do is add the countdown days and print it out on white card and you are set!


Revision Survival Pack Download

Good Luck to everyone studying and working hard for exams/assignments!

Love Rebecca

Image Map   

Saturday, 30 March 2013

Doctor Who is Back!

Finally, Doctor Who is back! Which means that I can share my TARDIS cushion that I made last year. 
I found this black, star-studded felt in hobbycraft last Summer and knew that I had to buy some although I had no idea what for. Shortly after, I realised that it was the perfect night sky, and the tie-dye pink/blue fabric on the borders of the cushion looked quite like a galaxy! So my cushion was born.
I used simple applique to add the pieces that make up the TARDIS itself and then embroidered the words.


Did you watch it tonight? Thoughts?

Love Rebecca


Image Map

Friday, 29 March 2013

My first knitted garment - a cardigan of sorts

At the start of the year I set myself several aims. One of which was to knit something to wear; something significantly more substantial than a scarf. And I finished!

I knitted this short sleeved cardigan from a King Cole pattern and a whole lot of chunky wool (I needed two extra balls compared to what the pattern suggested!)


I am linking up to Rosie @ Craftbotics Craft Challenge - next month's challenge is budget home decor - I am so excited about my project - the materials have been bought, and now I just need to get started!

Love Rebecca

Sunday, 30 September 2012

The Lil Journal Project

Have any of your been following this great project over at Lil Blue Boo? Basically, the wonderful Ashley posts these great journal prompts that you can use to start your own journal - from drawing your first classroom to mapping out your childhood neighbourhood, it is a great way to get creative and record some memories at the same time! And the best bit ....it doesn't matter if you haven't started yet! Join in! I have and cannot wait to do some more pages in my new journal!

My favourite prompt so far has to be day one. Ashley gives us a quote to write...in our non-dominant hand! I loved the freedom it gave - and the fact that it instantly sets the tone for the journal as imperfect but still perfect!


 Here is another snapshot of a couple of my pages - one with different hand writings on, and the other; a map of the neighbourhood in which I grew up!


So what are you waiting for? Grab a sketchbook and some pens/pencils and join in!

Have a great week

Thursday, 6 September 2012

Easy Lace Lampshade Tutorial


I have two lamps in my room. One is a really cool touch sensitive lamp with a glass shade and the other is just a standard silver lamp with a very standard shade. Except that shade has gotten very grubby. So grubby that I was too ashamed to take a picture and put it online! 

I finally got round to getting a new lampshade (just £2.99 from B&Q) but is just looked too plain.
So, I decided to spruce it up with some blue lace I bought for 20p from Boyes (in their clearance basket).

Here is my tutorial for a 5 minute DIY that will spruce up a simple lampshade - you only need three things and it will cost you less than a fiver to do! 


Materials
1 lampshade
Lace
Double sided tape


1. Apply double sided tape all the way round the top of the lampshade


2. Peel off the paper and starting at the lampshade's seam, stick the lace (very carefully) lining it up with the top of the lampshade. Make sure you press as you go round to secure in place.


3. Carry on until you get all the way round. Add another small piece of tape under the overlap to secure in place


And that's it. Job done...one lamp drastically improved!


Have you improved anything recently with a simple embellishment?

Love Rebecca

Linking up to a selection of these great Link Parties

Tuesday, 4 September 2012

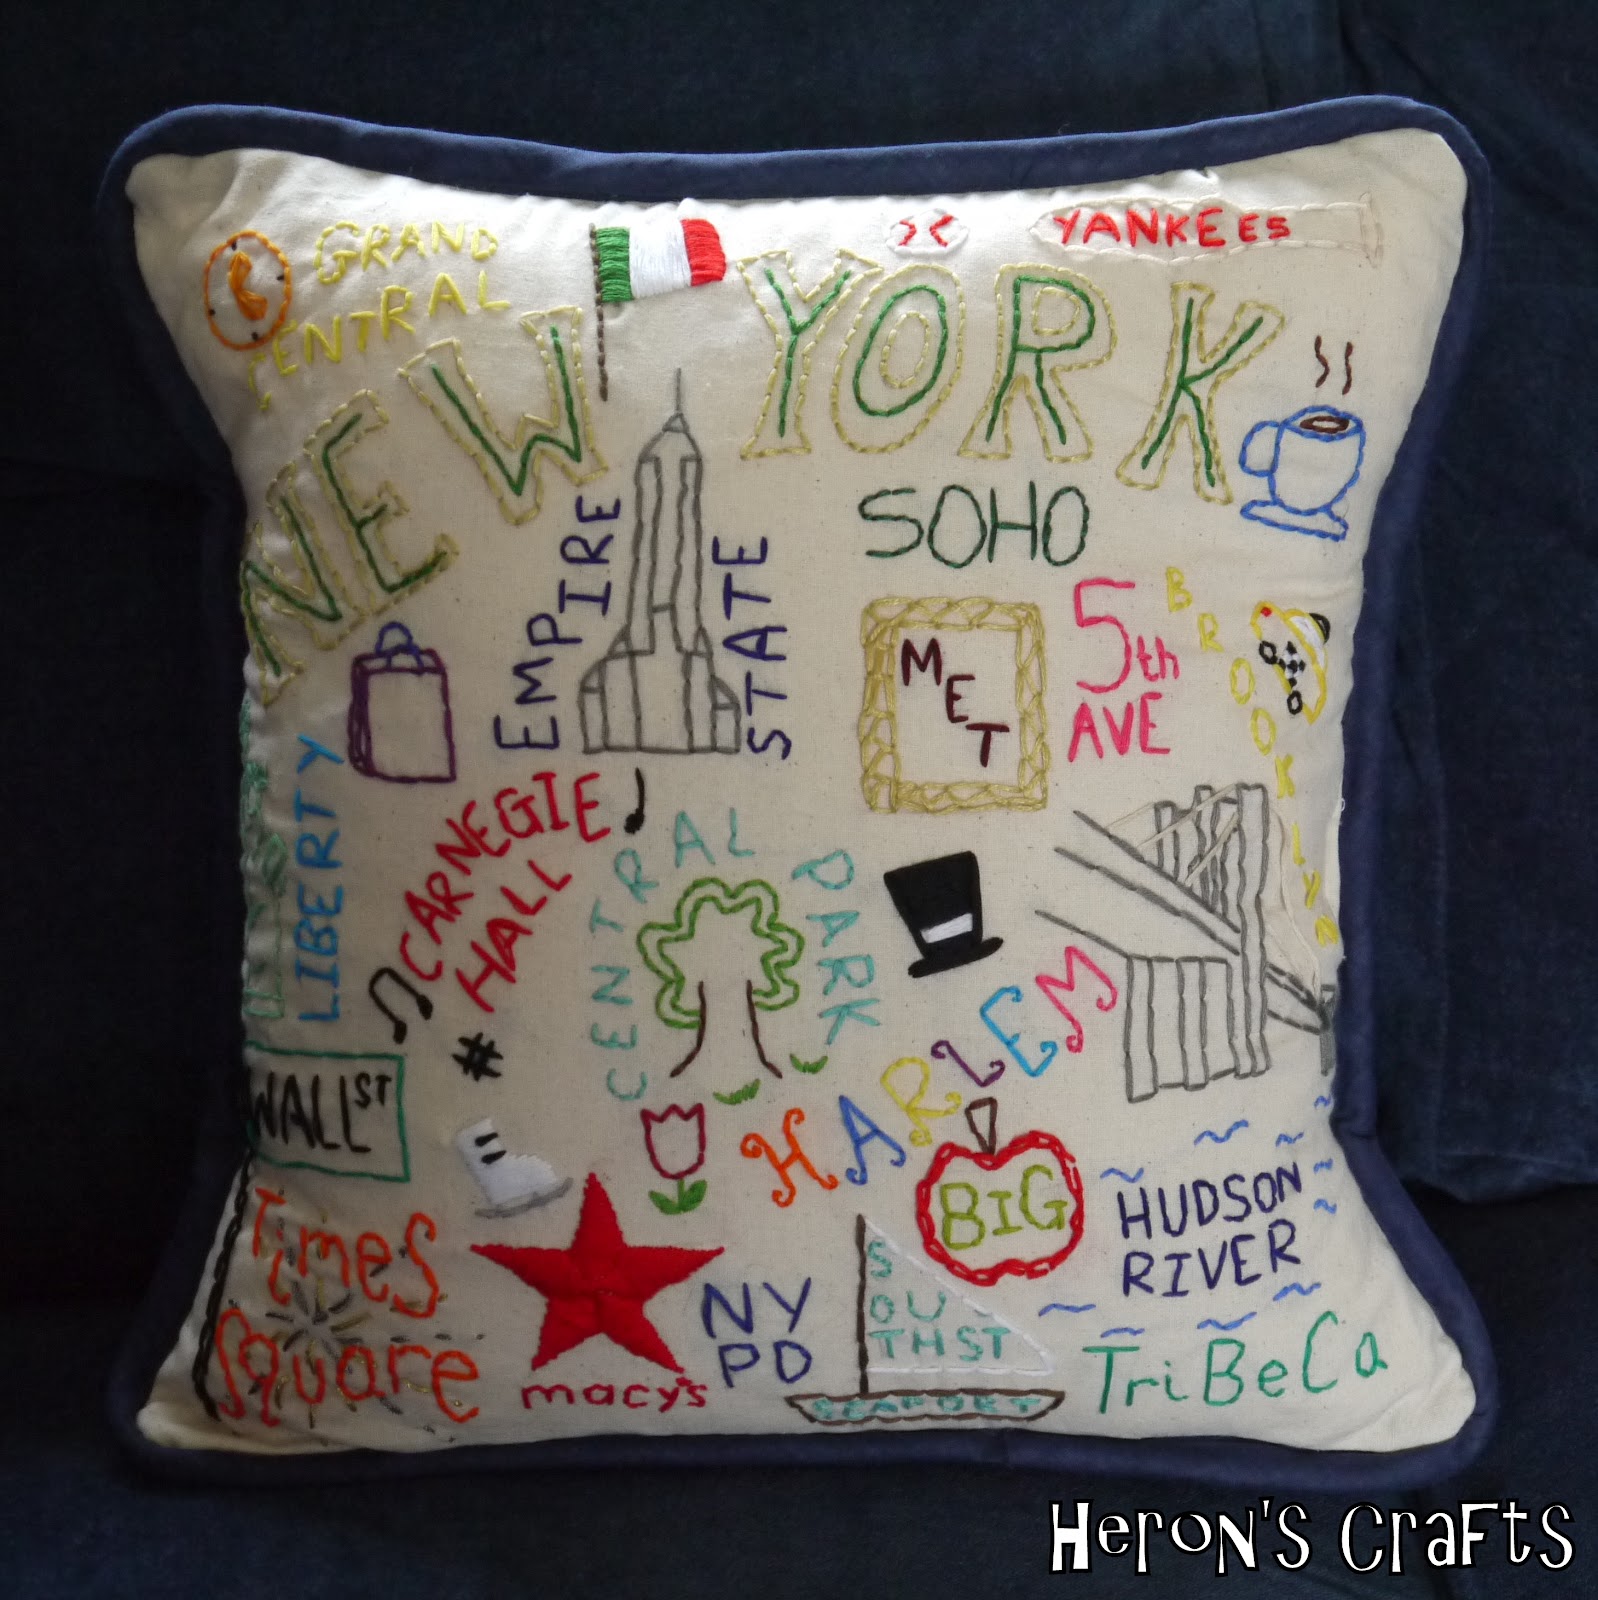
New York Embroidered Cushion


If you have been reading my blog this summer you will know I spent a few days in New York soaking up the atmosphere, seeing the sights and of course shopping! When in a little shop at the South Street Sea Port I came across some beautiful embroidered cushions...one for New York and one for Brooklyn. However, with a price tag of $159 I knew there was NO way I would be taking one home!

So when I returned, I had a go at making my own version. I started by sketching the main landmarks I wanted to include such as the Statue of Liberty, Empire State Building and Brooklyn Bridge. I then filled all of the gaps with words and pictures to represent other parts of New York. 

I used calico as it gave the colour I wanted whilst being thin enough for me to be able to trace my design directly on to the fabric making the embroidery much easier and neater. I raided my brightest embroidery threads and worked for four days embroidering all of the little pictures and words!

To finish the cushion off, I added a navy blue piping round the edge and an envelope back.


Did I include your favourite place in New York?

Love Rebecca

Linking up to a selection of these great Link Parties

Tuesday, 28 August 2012

Travel Backpack


A while back I bought some great vintage map fabric from a quilt show to make a bag for carrying all my essentials during the summer - camera, lenses, water bottle etc etc!


I based the design on the standard backpack style bags that are available but added a few features of my own.

1. Elastic inside pockets for water bottle and spare camera lenses 
2. Inside zip pocket for purse and passport.
3. Outside accordion pocket for bits and pieces


I also found some great faux leather bias binding to edge the flap and some leather fabric for the outside pocket and the closure flaps. I used magnetic clasps to close the bag and a tight drawstring for added security.


I am really pleased with how it turned and I took it to the Olympics and to New York - it was great for carrying EVERYTHING - it is very roomy!

Have you made any bags recently? 

Love Rebecca

Friday, 20 July 2012

Opening Ceremony Olympic Feast - Tie Dye Table Cloth


This is the first part of the Olympic Opening Ceremony British feast - a red, white and blue table cloth to jazz up your dinner table! The perfect base for your British Feast. 

This is my first EVER (shock horror!) attempt at tie dye so bear with me...here is what I learned...

The back of the dye packet says 'wear gloves' - don't ignore this instruction! - I did and ended up with dead-looking hands for the rest of the day!


Anyway... I bought a flat single sheet (this took major effort...do people not use flat sheets on their bed anymore?!?!) and used some Dylon Hand-use dyes to make this table cloth and I was really pleased with the result.

Materials

Flat single sheet (washed and left slightly damp)
Red and Blue dye
Elastic Bands
Squeezy Bottles (I used some ketchup bottles I bought for £1)
Bin bags

1. Pinch the sheet in the centre and pull up, wrapping together until your sheet is long and thin - see picture  (I then divided the second half into two as in the picture below - this was because my sheet was so big). Use elastic bands to tie together every 5-6 inches- make sure these are really tight!


2. Make up the dye as per the packet instructions. Pour into squeezy bottles and add colour to each section (alternate between red and blue leaving the very top section white)


3. Wrap each section in a plastic bag and leave for 5-6 hours. Remove from the plastic bag and run under cold water until the water runs clear. Remove the elastic bands and run under water again until the water is clear. Wash on a warm wash to set the colour


4. Unwind your sheet and admire your work!


Love Rebecca

Friday, 11 May 2012

Olympic Countdown - 11 Weeks to go - Olympic Keyrings


Just 11 weeks to go until the start of the London 2012 Olympics. This week I made some London keyrings inspired by these over at Sarah Ortega.
I have never had Jenga so couldn't use Jenga blocks to make these key rings. Instead, I used 7 x 2 x 1.2 cm blocks of wood. I bought a 1.5m long piece of 2cm wide, 1.2cm deep wood from B&Q and used a saw to make the 7 cm blocks. Make you sand the raw edges where you sawed and then you are ready to go!

Materials


7cm x 2cm x 1.2cm wooden blocks
Screw Eyes
Key Ring
Wrapping paper/maps etc.
Mod podge (or I use a mix of PVA and varnish)
Hammer
Nail


Instructions


1. Draw round all four sides of your block plus the bottom. Cut these out.


2. Using the hammer and a nail, make a small guide hole in the top of the block by gently knocking the nail into the top. Attach the key ring into the screw eye and screw into the guide hole you just made.


3. Modpodge the first side and stick the corresponding piece of paper on. Repeat with all four sides and the base. Cover the whole key ring with modpodge and leave to dry (I hang them by the key ring on a paintbrush which is suspended from two cups)


These technique is versatile an adaptable to creating keyrings for any occasion!

For my London Olympic keyrings I used...London tube map, Union Jack wrapping paper and crown wrapping paper (left over from the Olympic Storage Boxes).

You could also use magazines, wallpaper or scrapbook paper to create a totally unique keyring


So have a look in your stash and see what great papers are waiting to be transformed into cute keyrings

Love Rebecca

Linking to...

The Grant Life 
Naptime Crafters 
Six Sisters' Stuff
Family Ever After
Tatertots and Jello 
Positively Splendid 
Making the World Cuter 
Rae Gun Ramblings
Sew Much Ado
Fireflies and Jellybeans
A Creative Princess

Friday, 6 April 2012

Olympic Countdown - 16 weeks to go - Ticket Holder


My second Olympic project is another travel essential. We are getting the train to and from London for the Olympics this summer so I made this ticket holder to hold train and tube tickets. I continued on the red white and blue theme started with the passport cover and I am please with how it turned out! The holder is perfect for holding tickets that are about credit card sized.


Materials

Blue, white, red fabric (see step 1 and 2 for exact measurements)
Blue button
5 inches elastic string

Instructions

1. Cut out your fabric...
  1x blue 15cm x 12cm (inside of holder)
  1 x interfacing 15 cm x 12 cm
  1 x red 15cm x 9cm (ticket pocket)

2. To make outside...
Cut 4 x 1" by 12cm strips in the following colours
           1 x blue
           1 x red
           2 x white
Sew these together in the following order...blue, white, red, white.
Next to final white strip, sew a piece of blue fabric 12 cm x 12 cm. Trim so overall piece is 15cm x 12 cm. (as in the picture). Press the seams flat.

All pieces cut out
3. Take red pocket and fold over one long side twice and sew across to make a neat hem

Hem along top of pocket piece
4. Press red pocket in half so you have a line down the centre. Align pocket onto blue fabric inside of holder and sew along the folded line

Sew along fold line to create two pockets
5. Cut a piece of elastic about 4" in length

6. Next job is to sew everything together, you will need to make a sandwich...
        Lay interfacing down first, then put inside pocket fabric on top, right side up. Next lay over outside fabric right side down. Pin in place.

7. Fold elastic in two and pin between inside and outside fabrics, about half way down the shortest edge that is furthest away from your stripes (shown better in picture!)

8. Sew around the whole rectangle leaving a 1 1/2 inch gap on one of the long edges (use a 1/4" seam allowance)

Gap left for turning right side out
9. Turn right side out through gap. Press

10. Top stitch around entire holder closing gap

11. Use elastic to measure position of button and sew in place - mine was in the centre of the red strips but will depend on the exact measurement of your elastic


There you have it, a simple ticket holder the perfect size for train tickets! Hope you are enjoying the start of the Easter weekend!

Love Rebecca

Linking to
Positively Splendid
Rae Gun Ramblings
Sew Much Ado
Fireflies and Jellybeans  
Naptime Crafters  
Six Sisters Stuff

Sunday, 1 April 2012

March Round-up

On the 1st January 2012 I set out 6 goals for the new year. It is time to review March...

1. Learn to crochet and crochet some Christmas Decorations for next year
Again, no progress here this month, I have started some knitting projects though! Check out my Social Knitwork project - I would love to use it as a way to get to know the readers of my blog!

2. Run 6 miles
I am right on track with this aim this month! In total I have run 27.24 miles, with my longest run of 5.03 miles fulfilling my aim for March. Next month my aim is to up that to at least two runs of 5 miles in length to increase my confidence!

3. Read 25 books
I read some great books this month :) Started off with P.S. I love You - really enjoyed this book although it was very different to the film (which I love despite its ability to make me bawl like a baby) - the main difference is that the whole thing is set in Ireland rather than America. 
I travelled down to Birmingham for a day this month so had a lot of train time to read - I finished 'The Priveleges' in 2 days! For a random 99p book I really enjoyed it, it was an easy but interesting read. I liked how it jumped forward and managed to cover over 20 years in one book! 
But the best book I read this month has to be 'The Help'. The film came out in October and although I was tempted by the advert I did not go and see it in the cinema. I am glad I didn't, I thoroughly enjoyed the book and would recommend it wholeheartedly to pretty much anyone! It is an easy enough read but well written with brilliant characters. Looking forward to seeing the film when it comes onto Sky Movies.


4. Cook a new recipe every week (52 in the year) including at least 25 from different countries (we had a delicious Chinese meal to celebrate New Years Eve and I'm feeling inspired!)

Cooked 4 new recipes this month including 3 from different countries. I also created my recipe map to display the various countries my recipes have come from.

Moroccan Tagine
Shoyu Chicken


Calzones
American Burgers


5. Continue to develop this blog - more posts, series and ideas!

I have written 11 posts this month including 2 brand new tutorials (Passport cover and friendship bracelets)! 
 I have enjoyed cooking this month but look forward to doing some sewing now I am home for Easter - if only that essay would write itself!
I have also launched a brand new series - London 2012 countdown to feature Olympic themed projects every week until the Summer games begin!
So stay tuned for some more projects on the way :)


Have a Great Month


Love Rebecca
Related Posts Plugin for WordPress, Blogger...